Introduction to Phoenix LiveView
Coding Rich Interactive User Interfaces in Elixir
Maintaining codebases with JavaScript can be a hassle. From trying to keep your bundle size small to ensure you have the correct linting. Some developers (like me) like to write in one language for both the front and back end.
Enter LiveView
As defined in the docs, "LiveView provides rich, real-time user experiences with server-rendered HTML." LiveView is the Frontend Engine that comes coupled with the Elixir Framework Phoenix. It performs all the magic you can do with JavaScript on the Frontend. It is written in Elixir and runs on the Erlang BEAM (The Erlang Virtual Machine). It is implemented as a Genserver process.
Prerequisites
In this tutorial, we will build a simple web page that changes the name provided with another one using the Phoenix Framework, and I will be walking you through how to set it up and use it.
Basic knowledge of Genservers
Basic knowledge of Phoenix Framework
Code Editor (VS Code preferably)
Basic HTML & CSS knowledge
Installation
To get LiveView, you need to install Elixir and its dependencies, and then install Phoenix Framework. LiveView comes as a part of Phoenix v1.5 and upwards. We will be using LiveView with a new installation. If you want to add it to your existing Phoenix project, follow the guide on the docs page
Once you're done setting up, type the following command in your command line to create a new Phoenix project with LiveView
mix phx.new hash_node --live
The --live is the flag that indicates you want to use LiveView in your project.
Once you are done with the setup, open the folder with your favorite code editing tool for the rest of the session.
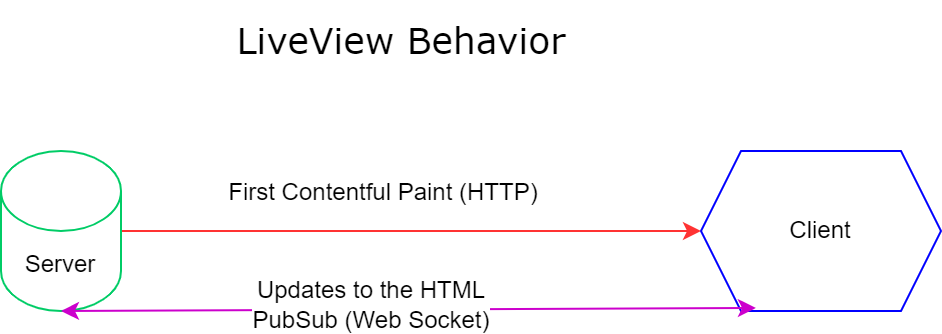
Behavior
LiveView uses a declarative model of programming. This means it does not reload your entire page whenever there is a change to any element. Instead, it keeps a web socket between the client and the server and exchanges messages. If there is any change, a message is sent between the two, and the element that has changed will be the only one that is re-rendered by the server and sent to the client.
Life Cycle
LiveView starts as a typical HTML rendered through normal HTTP requests, as stated in the image above. But it is then upgraded to a stateful view when a connection is established between the client and the server. Even when JavaScript is disabled, the connection persists, and changes will be rendered.
When LiveView is rendered for the first time, the mount/3 callback is invoked. This callback will carry any parameters the server wants to send to the client, the session data, and the socket. Here is what it will look like:
def mount(_params, _session, socket) do
  {:ok, socket |> assign(socket)}
end
After this, the handle_params/3is called if there are any URI or form parameters that are to be handled, and finally, the render/1 is called to render the actual page to the user.
 def render(assigns) do
        ~H"""
            <h1> Hello!</h1>
            <p> This is an example of LiveView
        """
    end
When the page is rendered, a connection between the server and client is kept alive using web sockets. When there is a change on the page, it will be handled by the handle_params/3 callback, and render/1 is called again to view the change. For the server to interact with client events, phx- bindings are used in the frontend code and the handle_event/3 handles that. A full list of all the bindings is here
How To Use LiveView
Using LiveView in your Phoenix project can either be by using it on your .heex template files directly or as components. We will be implementing the direct option, but you can check out the components via this link on the LiveView Component documentation.
After setting up, the next thing to do is to prepare the route where LiveView will be used. Find your router.ex file in your project and add the LiveView route underneath the scope you want to use it
defmodule HashNodeWeb.Router do
  use HashNodeWeb, :router
  scope "/", HashNodeWeb do
    pipe_through :browser

    get "/", PageController, :index
    live "/hashnode", HashLive
  end
end
After that, create the module that will contain the LiveView code, in this case, it will be hash_live.ex and is located in the path /lib/hash_node_web/controllers/live/.
defmodule HashNodeWeb.Live.HashLive do
  use Phoenix.LiveView
  def render(assigns) do
    ~H"""
    <h1>Hash Node</h1>
    """
  end
  def mount(_params, _session, socket) do
    {:ok, socket}
  end
end
Save the file and run `mix phx.server on the cli. YYou may run into some errors with the database connection, but your application will work. You can disable Repo if you don't want to see the errors. At this phase, this is what you will see:
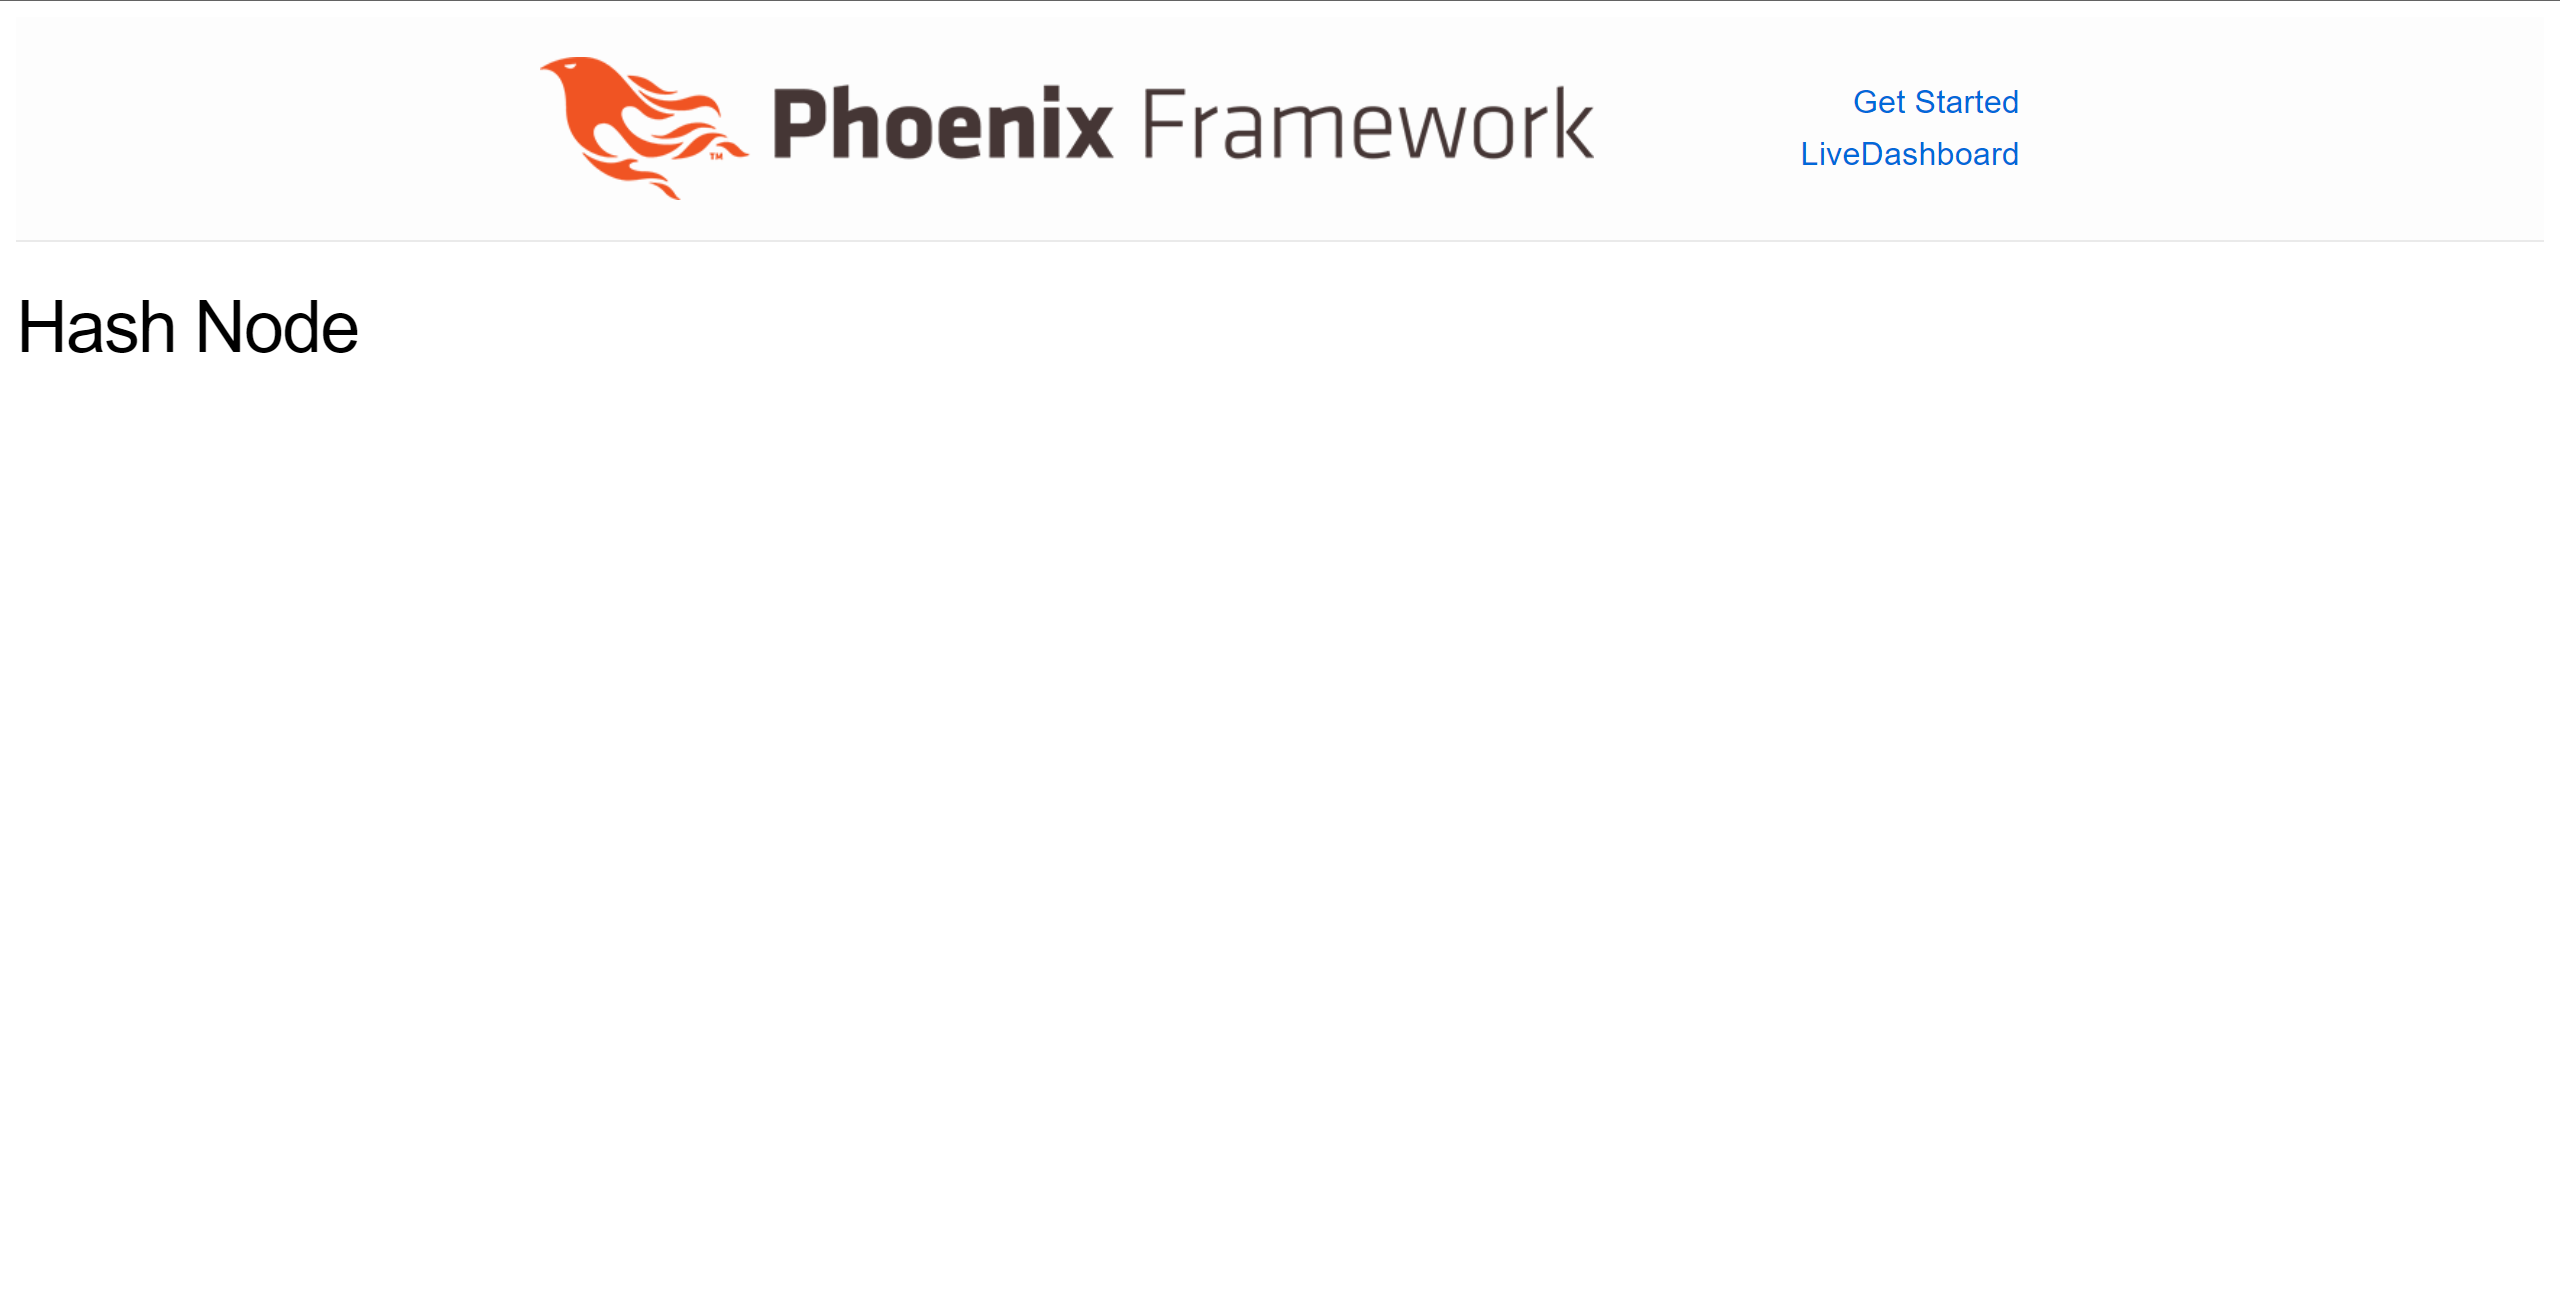
As you can see, the H1 tag we wrote in the render/1 definition is what was rendered on the page. Let's go ahead and add some reactivity on the page to see how that works. We will add a button and a name that changes to another name when you click the button. For that, we will introduce some bindings in render/1, a parameter in mount/3, and the handle_event/3 definition in our code. The complete code will now look like this
defmodule HashNodeWeb.Live.HashLive do
  use Phoenix.LiveView
  def render(assigns) do
    ~H"""
    <h1>Hash Node</h1>
    <p> <%= @name %> </p>
    <button class="btn btn-lg" phx-click="click" phx-value-randomize="true"> Change Name </button>
    """
  end
  def handle_event("click",  %{"randomize" => randomize}, socket) do
    {:noreply, socket |> assign(name: "Salim")}
  end
  def mount(_params, _session, socket) do
    {:ok, socket |> assign(name: "Hayatu")}
  end

end
If everything works fine, you should see this
Hooray! We have been able to implement LiveView and manipulate data using bindings! With this, we can go ahead and make our next little project or the new startup you are thinking of (wink wink). With this setup, you can go ahead and do everything on that file. But what if your project grows in complexity and functionality and you want to separate views into individual files? That is where Colocating Templates come into consideration. You can basically put all your LiveView codes in the path /lib/hash_node_web/controllers/live/. All you need to do is to remove the render/1 definition from hash_live.ex and create a new file in the same path, like hash_live.html.heex. It will look like this
<h1>Hash Node</h1>
<p> <%= @name %> </p>
<button class="btn btn-lg" phx-click="click" phx-value-randomize="true"> Change Name </button>
Conclusion
LiveView is rich with amazing ways to interact with DOM elements using just Elixir. It is quite clear that with LiveView, all you will be doing to make rich interactive user interfaces is just Elixir and some HTML/CSS. We have covered how to set it up from barebones, and then use it in two different ways. This article is just an introduction, as there are some things we could not cover (like components, file uploads, etc.) because of how broad they are. You can find out so much more about LiveView from the docs page.
I hope I have been able to show you how Elixir can help you achieve almost everything without the need for outside plugins or languages. Happy Coding!
